In the last blog post we setup a Git repo and build pipeline for our Eureka server and deployed it to Bluemix. Now that our Eureka server is deployed to the cloud we can deploy the services which leverage Eureka. In this blog post I will walk through how to do this for the Participants service, but the process will be the same for the other services as well. Once you have successfully deployed the Participants service just follow the same steps for the other services (Races, Web, and Hystrix).
First lets create a Git repo in IBM DevOps Services for our Participants service. Got to jazzhub.net, sign in, and click the Create Project button. Select the option to Create a new repository, and select the option to either create a Git repo on Bluemix or GitHub. The only other option that is required for you to select is Make this a Bluemix project. When you select this option make sure you pick the same organization and space that you deployed your Eureka server to. If you would like, you can select/deselect the other options on this page based on what you want to do. Finally, click the Create button to create the repository.
Before we put the code in the Git repo we need to create a .gitignore file to ignore the files we don’t need in the repo. Open a terminal window and navigate to the root directory of your Participants service (the folder containing the POM). Open your favorite text editor, create a new file called .gitignore and add the following content.
.settings
target
.classpath
.project
Once you have saved the .gitignore file run the following set of commands.
$ git init
$ git add .
$ git commit -m "initial commit"
$ git remote add origin <url to git repo on Bluemix>
$ git push origin master
All we are doing above is initializing a local Git repo, adding all our code to it, committing it, adding our new remote Git repo, and than pushing all the code we committed locally to our remote Git repo in Bluemix. This should be nothing new to you if you are familiar with Git. Once the code has been committed to the remote Git repo in Bluemix, you can refresh the repository page in IBM DevOps Services and you should see all your code.
Configuring A Service To Run In The Cloud
Right now all of our services are configured to look for the Eureka server at http://localhost:8761/eureka/. We will need to change this URL to point to our Eureka server in the cloud. We could hardcode the URL into the application.yml, but being good Cloud Foundry developers we are going to use the user-provided service we created for Eureka at the end of the previous tutorial instead.
In addition to changing the location of the Eureka server in the application.yml, file we need to give Eureka more information about the Participants service. Eureka will need to know the correct hostname of the service when the service registers with Eureka and we also need to give Eureka a unique instance id for each individual instance of the service. The unique instance id is specifically important for when we scale the services horizontally, ie we have 2 instances of the Participants service running.
Finally, we need to specifically configure the port we are running on in the cloud. By default Spring Cloud uses the port the server starts on. When we are running in Bluemix and Cloud Foundry the port the application is running on behind the Cloud Foundry router is a random port. However, the Cloud Foundry router serves the application on port 80 and 443, so we need to tell Eureka that the service is running on pot 80 instead of the port the app container is running on behind the Cloud Foundry router. To solve this problem we add a Spring Profile to our application.yml file which will only get activated when we deploy the application to the cloud.
Open the application.yml file for your Participants service and change the Eureka section to have the following properties.
eureka:
  client:
    serviceUrl:
      defaultZone: ${vcap.services.ocr-eureka.credentials.uri:http://localhost:8761/eureka/}
  instance:
    hostname: ${vcap.application.uris[0]:localhost}
    metadataMap:
      instanceId: ${vcap.application.instance_id:${spring.application.name}:${spring.application.instance_id:${server.port}}}

---
spring:
  profiles: cloud
eureka:
  instance:
    nonSecurePort: 80
Make sure you commit and push the changes you made to your application.yml file to Bluemix before continuing.
Setting Up A Build And Deploy Pipeline
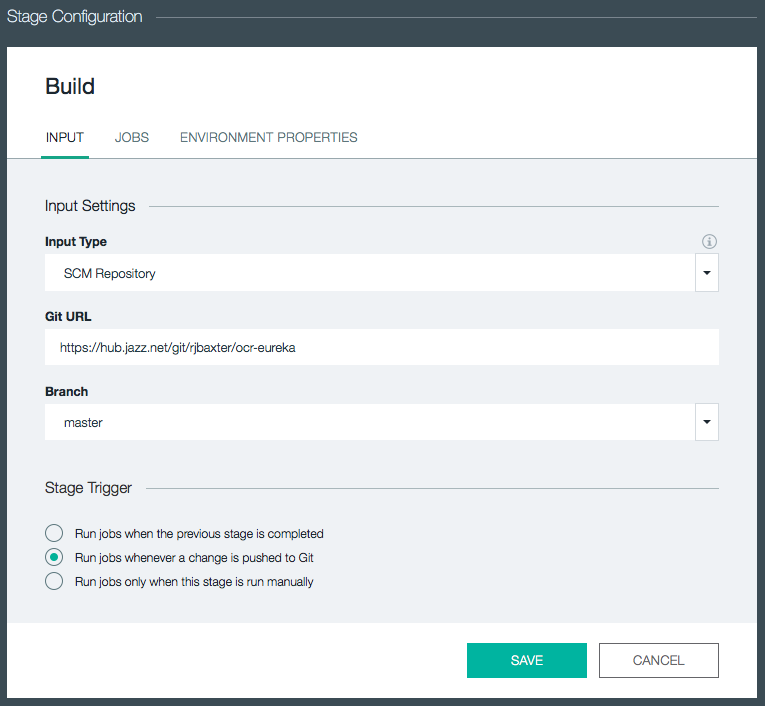
Now lets configure the build and deploy stages for our Participants service on Bluemix. Back in the the project on IBM DevOps Services click the Build and Deploy button. Click the Add Stage button to add a new stage. Give the stage the name Build. For the Input Type, select SCM Repository, this should automatically populate the Git URL field. Make sure master is selected under the Branch drop down. In the Stage Trigger section select “Run jobs whenever a change is pushed to Git”.
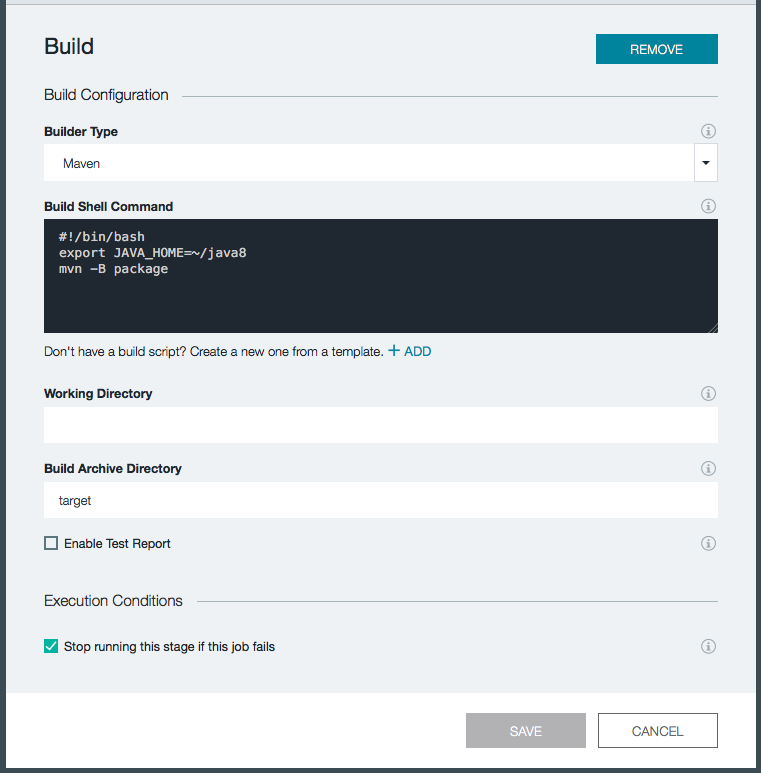
Next click on the Jobs tab. Click the ADD JOB button and select Build. Under the Builder Type select Maven. The defaults for the build should be fine, we just need to make a small change to the shell script. Our code is using Java 1.8 but by default the build will use Java 1.7. To fix this problem change we need to change the JAVA_HOME environment variable to point to Java 1.8.
#!/bin/bash
export JAVA_HOME=~/java8
mvn -B package
Click Save to save the Build stage.
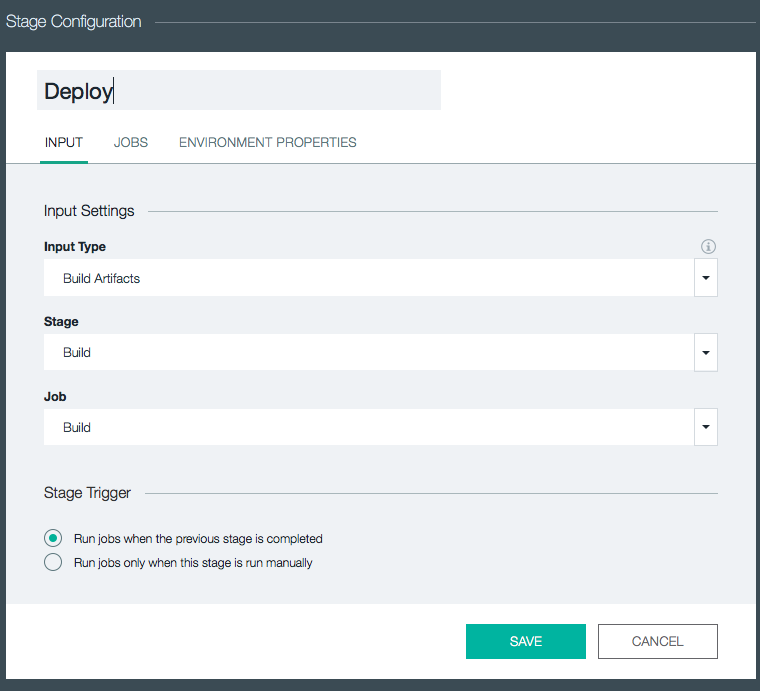
Back on the Build and Deploy page click the Add Stage button again to add another stage. Give the stage a name of Deploy. Under Input Type select Build Artifacts. By selecting Build Artifacts for the Input Type this stage will be provided with the build artifacts from another stage. In the Stage and Job drop downs select Build. Under stage trigger, select “Run jobs when the previous stage is completed” so that our deploy stage will run automatically after the Build stage finishes.
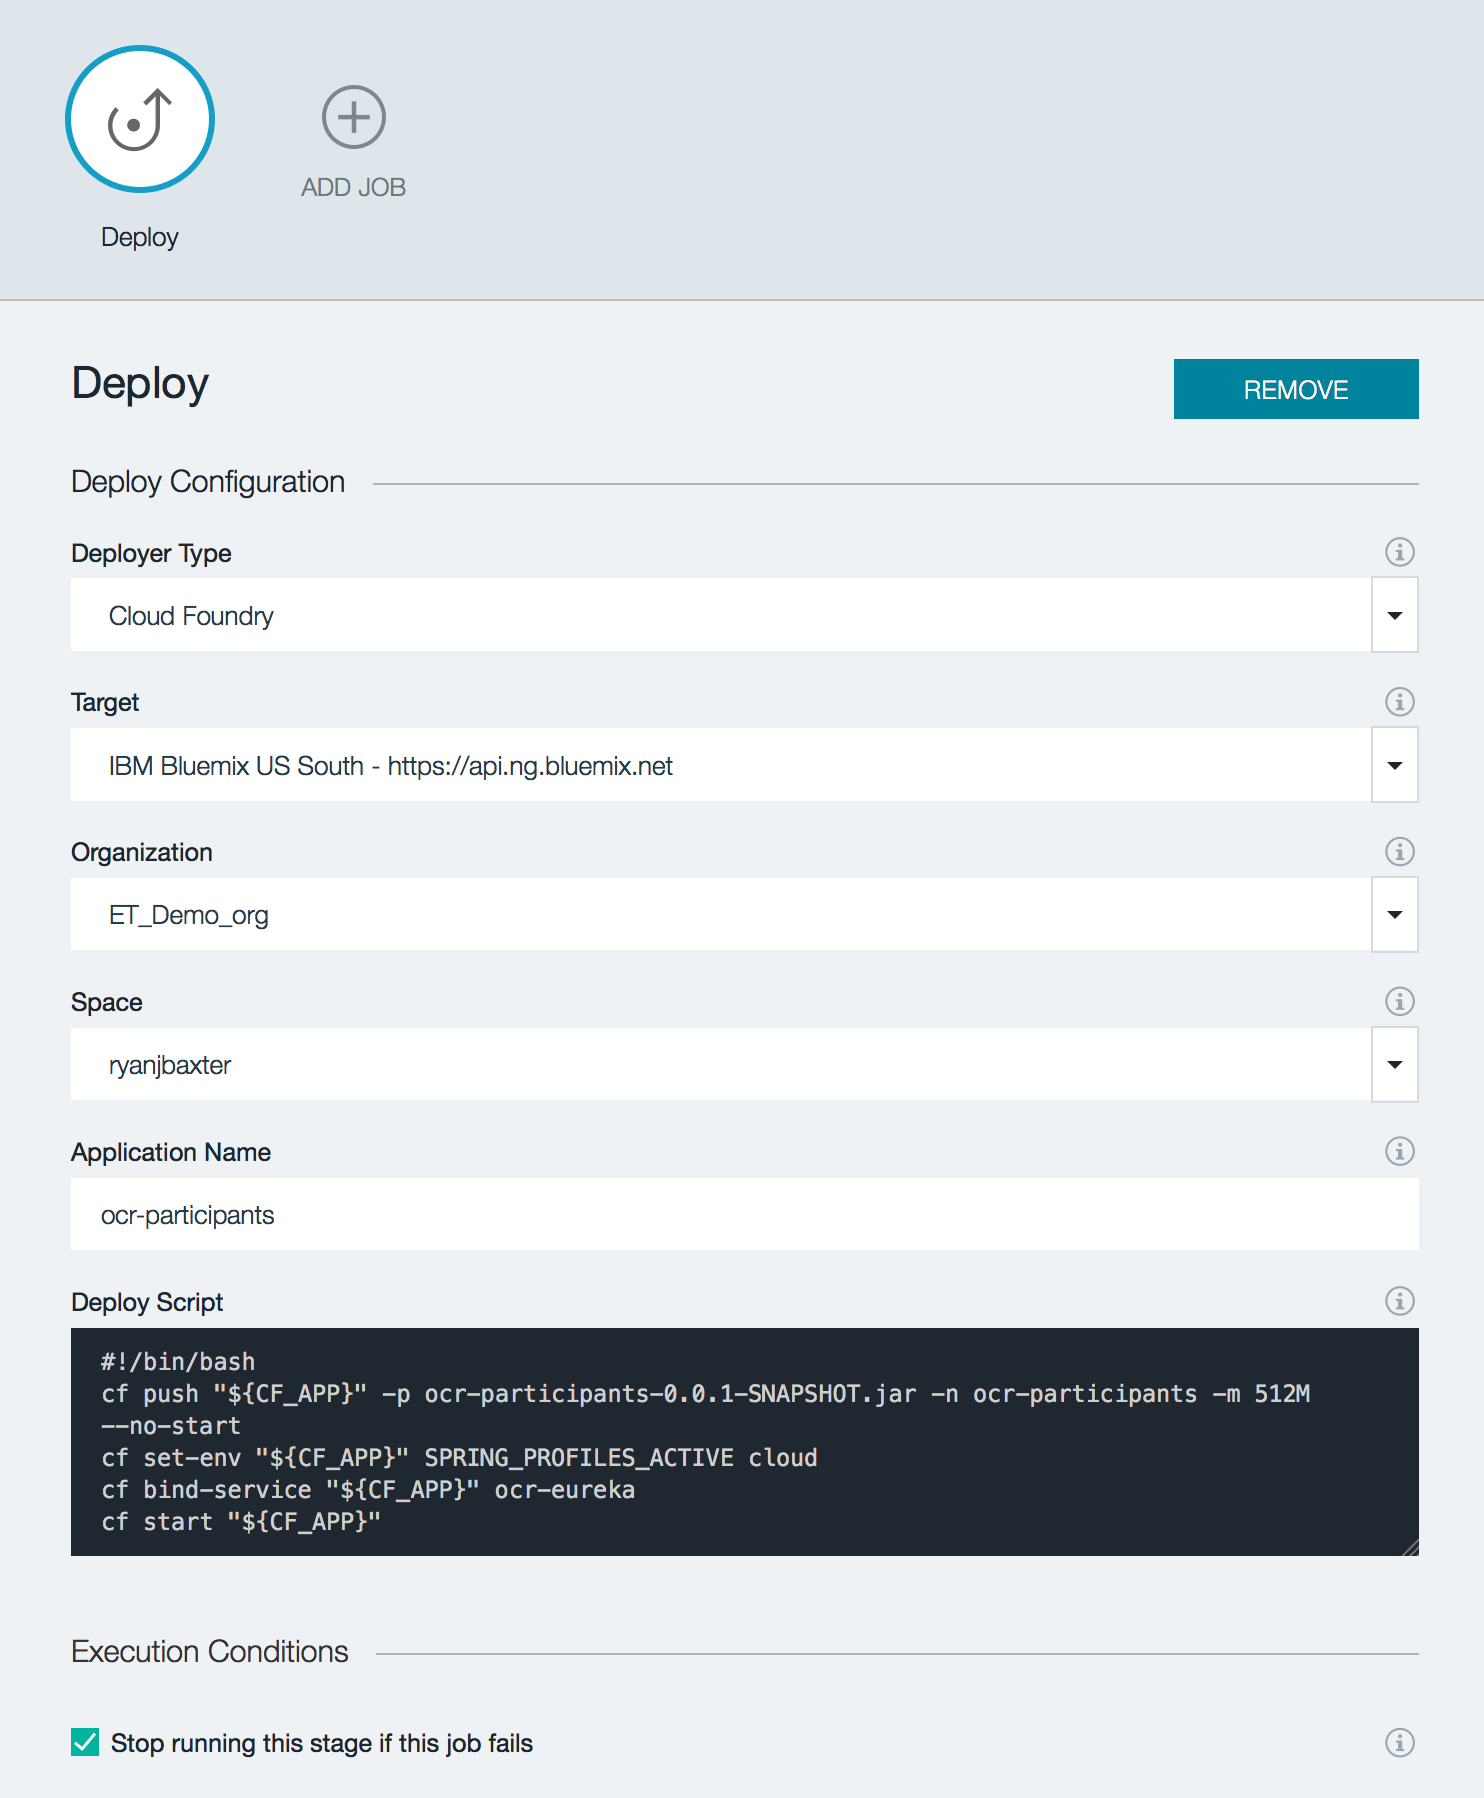
Next click the JOBS tab. Click ADD JOB and select Deploy. Under Deployer Type select Cloud Foundry. Under Target pick the datacenter you want to deploy to. Then select the Organization and Space you want to deploy the application to. We will need to modify the deploy script slightly to point at the Jar file we want to deploy. In addition to adding the Jar to deploy you probably will also want to configure the hostname for the Participants service. If you don’t you can run into failures when you deploy the application if the hostname is already in use.
After we push the jar file we then set an environment variable called SPRING_PROFILES_ACTIVE to cloud. This will enable the cloud profile in our application so our cloud configuration in our application.yml file becomes active. Lastly we bind to our ocr-eureka service, which we created in the previous blog post. This ocr-eureka service provides our application with the URL to our Eureka server.
Change the Deploy Script as follows.
#!/bin/bash
cf push "${CF_APP}" -p ocr-participants-0.0.1-SNAPSHOT.jar -n ocr-participants -m 512M --no-start
cf set-env "${CF_APP}" SPRING_PROFILES_ACTIVE cloud
cf bind-service "${CF_APP}" ocr-eureka
cf start "${CF_APP}"
You will want to change the value of the -n option in your script to be a unique hostname of your choosing.
Click Save to return to the Build and Deploy screen.
Now you can test everything out by clicking the play button on the Build stage. This will preform the build and then do the deployment to Bluemix. If you would like to watch the Build and Deploy stages you can click the View logs and history links to see realtime logs of what is happening during each stage. After the deployment finishes the Deploy stage will contain a link to the running Participants service. Click the link and it should open a new tab and return the JSON for all the participants in the Participants service. In addition, the Participants service should register itself with Eureka in the cloud. If you open your Eureka server running in the cloud you should see the Participants service registered.

Deploying The Other Services
Now that we have the Participants service setup and deployed follow the same process for the other services (Races, Web, and Hystrix) as well. After everything is up and deployed you should now have a running web app deployed to the cloud.
Testing Your Application
If you go to the URL bound to your ocr-web application in Bluemix you should see a list of races displayed and be able to select those races to see participants. If you do, you have successfully deployed your first cloud native application! In addition Eureka should contain a list of all the services we have running in the cloud.

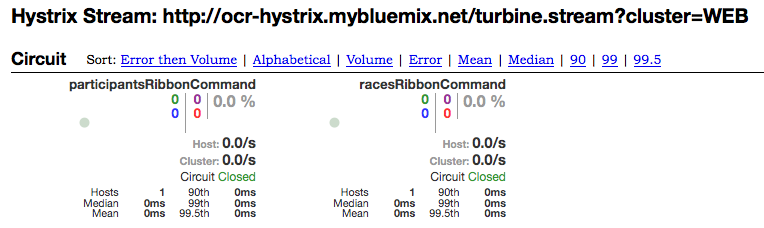
Finally you should now be able to go to your Hystrix dashboard running in the cloud and view data about your circuit breakers. Open the URL bound to your Hystrix application (don’t forget to add /hystrix to the end of it) and enter your Turbine URL (refer back to this post if you can’t remember how to construct it). You should see your circuit breakers displayed in your Hystrix dashboard!