
Building upon my previous blog post on Spring Boot, I would now like to talk about building REST APIs with Spring Boot. For the past 3 years or so, I have not created a web application that did not have REST APIs. REST has become the go to way for building web services in today’s applications. I am not going to spend time discussing what REST is or why it is so popular so if you are not familiar with REST and the benefits of building REST APIs there are plenty of good resources out there discussing these topics that I suggest your read first. In this blog post I would like to describe how easy it is to build a REST API that persists data to a Mongo database. (There is nothing specific about building REST APIs with Mongo DB in Spring Boot. You can easily replace Mongo with MySQL, PostgreSQL, Couch DB, or any other DB technology you would like to use.)
First, lets scaffold up our project. Head to start.spring.io and fill out the form as follows and click Generate Project.
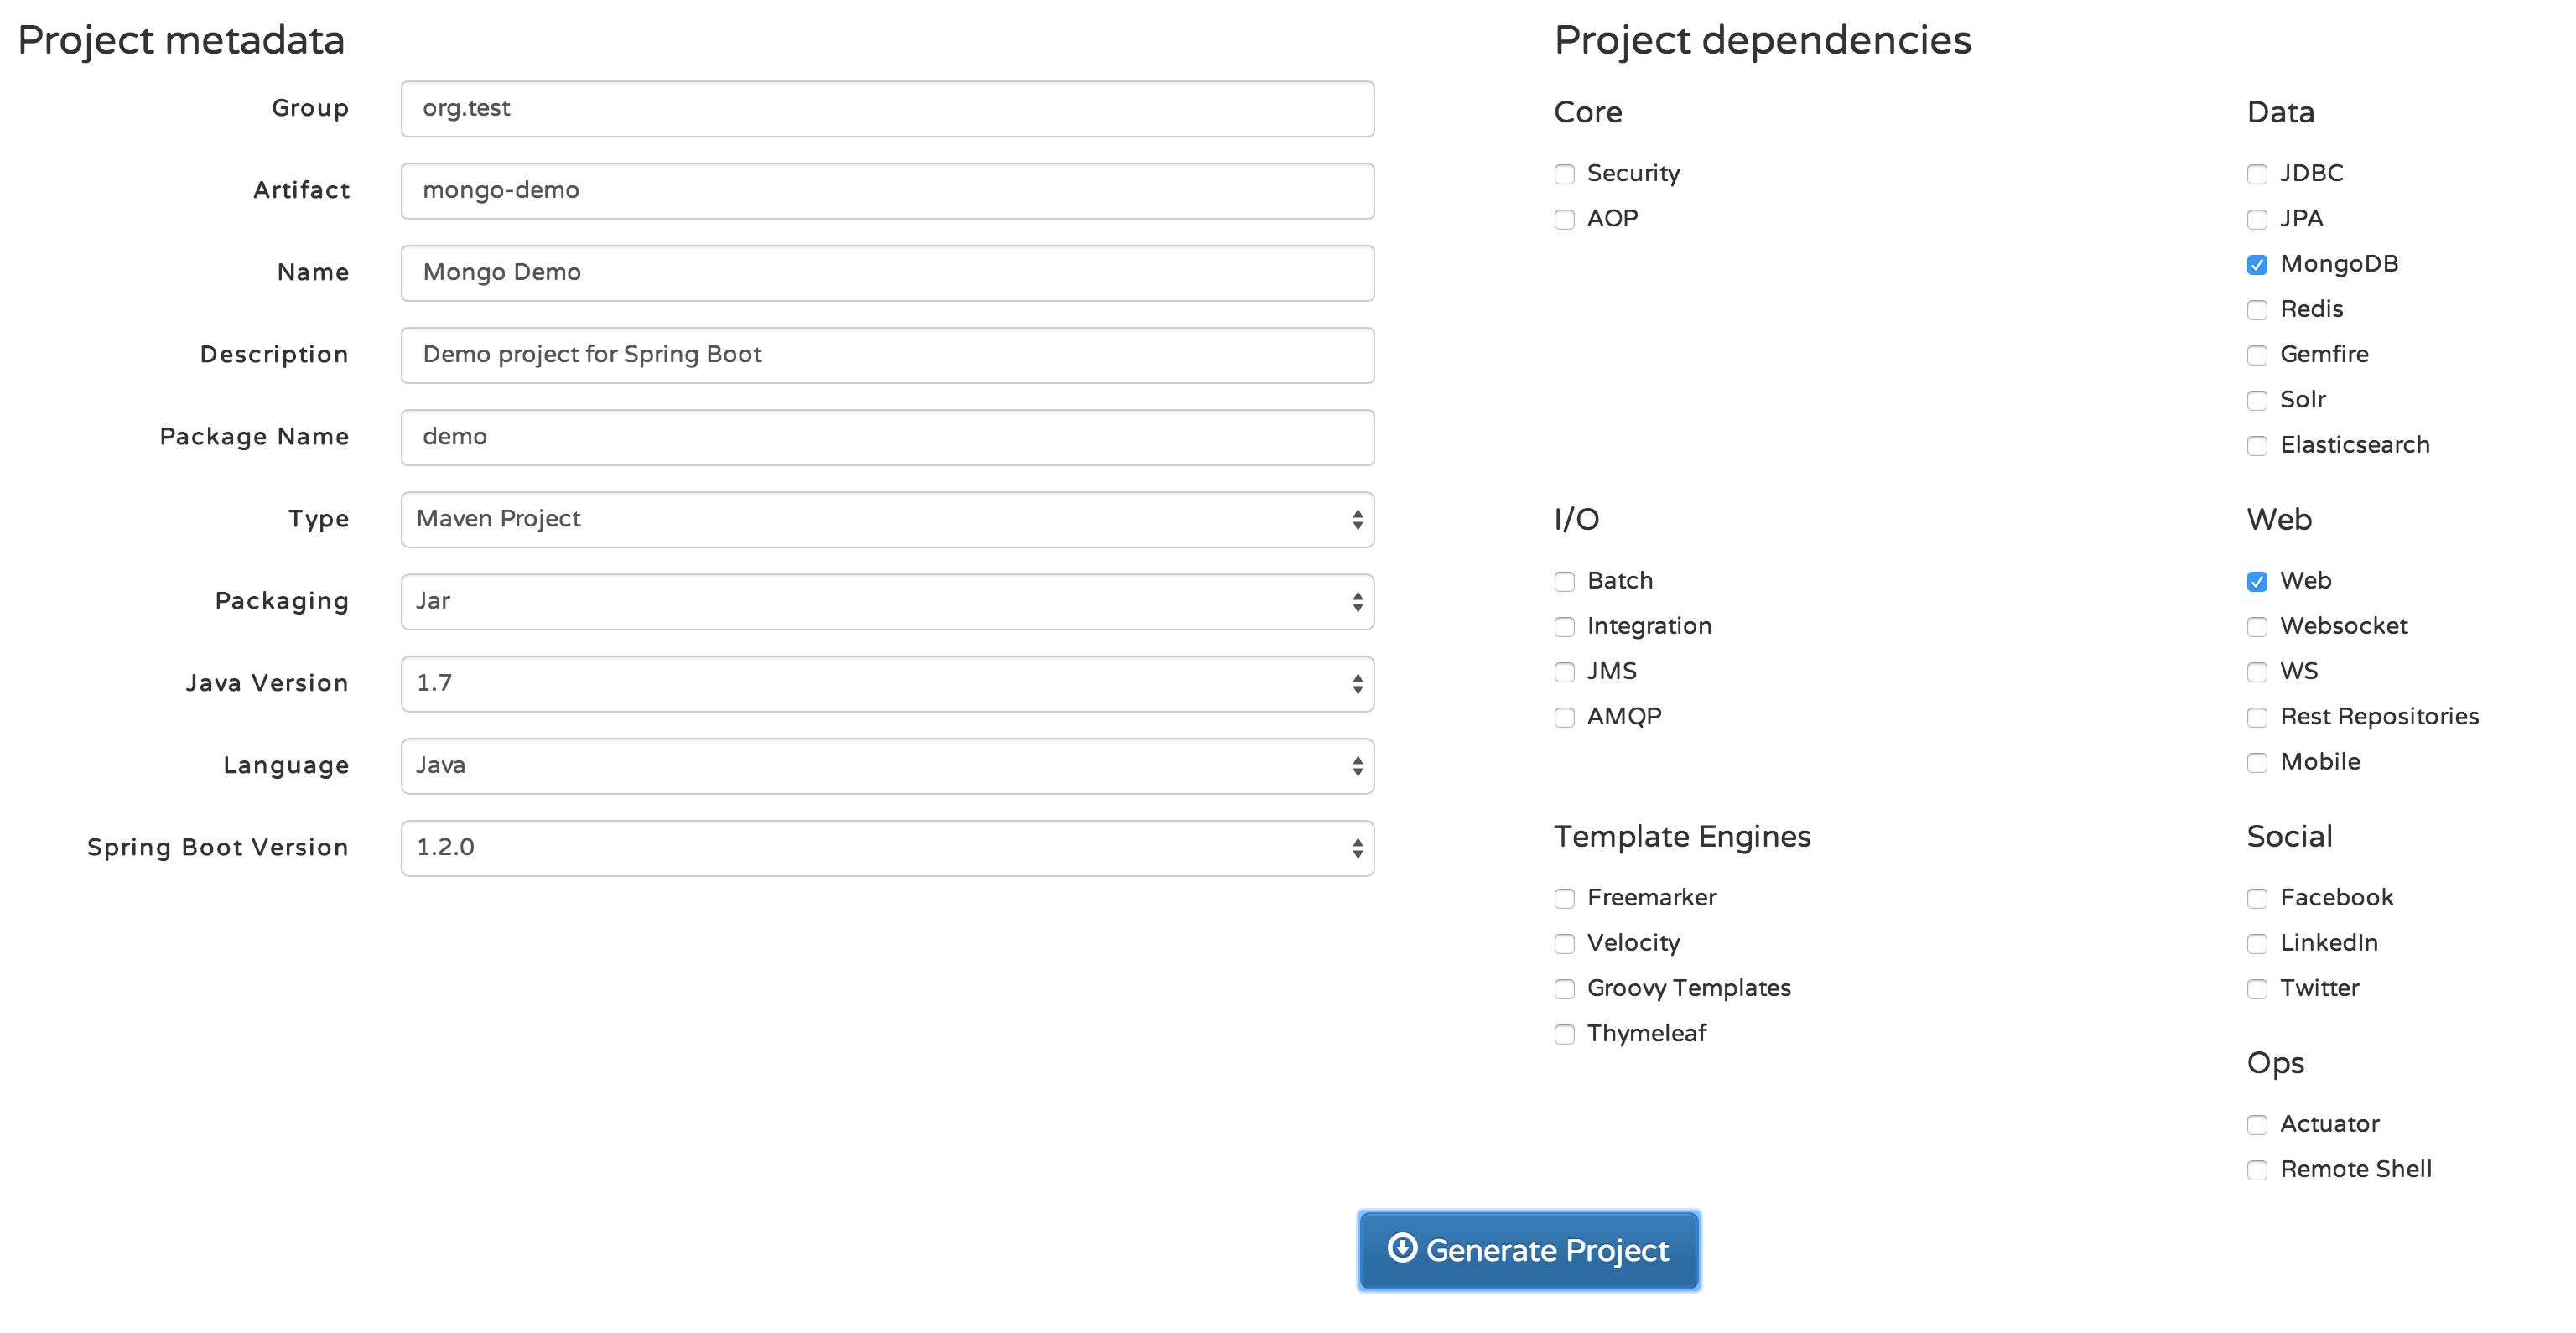
Extract the zip created by the tool and import the Maven project into your Eclipse IDE. If you look at the POM file included in the project you will notice we have two dependencies, one for the web starter and another for the Mongo starter, that is all we will need :).
We will need a domain object to create our API around, in this example we will build an API around contacts, something like an address book. Here is the code I used for my contact Java object.
import org.springframework.data.annotation.Id;

@Document
 public class Contact {

  @Id
  private String id;
  private String firstName;
  private String lastName;
  private String address;
  private String phoneNumber;
  private String email;
  private String twitterHandle;
  private String facebookProfile;
  private String linkedInProfile;
  private String googlePlusProfile;

  public String getId() {
    return id;
  }

  public void setId(String id) {
    this.id = id;
  }

  public String getFirstName() {
    return firstName;
  }

  public void setFirstName(String firstName) {
    this.firstName = firstName;
  }

  public String getLastName() {
    return lastName;
  }

  public void setLastName(String lastName) {
    this.lastName = lastName;
  }

  public String getAddress() {
    return address;
  }

  public void setAddress(String address) {
    this.address = address;
  }

  public String getPhoneNumber() {
    return phoneNumber;
  }

  public void setPhoneNumber(String phoneNumber) {
    this.phoneNumber = phoneNumber;
  }

  public String getEmail() {
    return email;
  }

  public void setEmail(String email) {
    this.email = email;
  }

  public String getTwitterHandle() {
    return twitterHandle;
  }

  public void setTwitterHandle(String twitterHandle) {
    this.twitterHandle = twitterHandle;
  }

  public String getFacebookProfile() {
    return facebookProfile;
  }

  public void setFacebookProfile(String facebookProfile) {
    this.facebookProfile = facebookProfile;
  }

  public String getLinkedInProfile() {
    return linkedInProfile;
  }

  public void setLinkedInProfile(String linkedInProfile) {
    this.linkedInProfile = linkedInProfile;
  }

  public String getGooglePlusProfile() {
    return googlePlusProfile;
  }

  public void setGooglePlusProfile(String googlePlusProfile) {
    this.googlePlusProfile = googlePlusProfile;
  }
 }
As you can see this is pretty much your standard Java class, nothing really special. The only thing that is not normal is the @Id annotation. The Spring Mongo dependencies use this annotation to bind this field to the id for the object created in the Mongo database.
Now that we have our domain object, it would be nice if we had a Java class that allowed us to interface with Mongo DB and provided methods for us to manipulate the data within the database. This is incredibly easy with the Spring Mongo starter dependencies, all we have to do is create an interface that extends MongoRepository. Here is what that looks like
import org.springframework.data.mongodb.repository.MongoRepository;
public interface ContactRepository extends MongoRepository<Contact, String> {}
Thats it….no really that is all we have to do! You are probably saying, “Ryan, this is an interface we at least need an implementation of it right?”. Nope we don’t need to do anything, Spring will take care of it for us. All we need to do is make sure we specify our domain object (Contact) and the type of the ID of our domain object (String) in the parameters for MongoRepository. You can even define custom query methods as well without having to implement anything. The repository even takes of serializing and deserializing from Java to JSON for us. How this all works is worth another blog post in itself. If you are interested in some of the finer details you can read the documentation.
Finally we need to define our REST APIs. For this we can use the @RestController annotation to annotate a class that will encompass all of our REST APIs. We will also use the @RequestMapping annotation to define the URL path to our API as well as HTTP method and path parameters for our APIs. Here is the stub of our REST controller.
import java.util.List;
import java.util.ArrayList;

import org.springframework.beans.factory.annotation.Autowired;
import org.springframework.web.bind.annotation.PathVariable;
import org.springframework.web.bind.annotation.RequestBody;
import org.springframework.web.bind.annotation.RequestMapping;
import org.springframework.web.bind.annotation.RequestMethod;
import org.springframework.web.bind.annotation.RestController;

@RestController
@RequestMapping("/contacts")
public class ContactRestController {

@RequestMapping(method=RequestMethod.GET)
  public List<Contact> getAll() {
    return new ArrayList<Contact>();
  }

  @RequestMapping(method=RequestMethod.POST)
  public Contact create(@RequestBody Contact contact) {
    return null;
  }

  @RequestMapping(method=RequestMethod.DELETE, value="{id}")
  public void delete(@PathVariable String id) {

  }

  @RequestMapping(method=RequestMethod.PUT, value="{id}")
  public Contact update(@PathVariable String id, @RequestBody Contact contact) {
  return null;
  }

}
As you can see we use the @RequestMapping annotation at both the class level and the method level. At the class level we use it to define the URL path at which our CRUD APIs will live, in this case it is at /contacts. We could have also defined this in the @RequestMapping annotation at the method level but this saves us some repetitive typing.
At the method level we specify the HTTP method we want to use for each Java method (GET, POST, PUT, DELETE) and any additional path parameters we might want to use. Some examples usually make things more concrete.
If you make a GET request to /contacts that will cause the getAll method to be called. While if you make a DELETE request to /contacts/123 that will cause the delete method to be called and 123 will be passed in as the parameter to the delete method. The @PathVariable annotation allows you to map Java parameters to a path parameter (anything surrounded by brackets in the value parameter in the @RequestMapping).
We also use the @RequestBody annotation to take the request body and map it to a parameter in a Java method. Spring helps us out here by serializing the JSON in the HTTP request to a Java object (in this case, Contact).
Lets fill in this class with the implementation of these methods
import java.util.List;

import org.springframework.beans.factory.annotation.Autowired;
import org.springframework.web.bind.annotation.PathVariable;
import org.springframework.web.bind.annotation.RequestBody;
import org.springframework.web.bind.annotation.RequestMapping;
import org.springframework.web.bind.annotation.RequestMethod;
import org.springframework.web.bind.annotation.RestController;

@RestController
@RequestMapping("/contacts")
public class ContactRestController {

  @Autowired
  private ContactRepository repo;

  @RequestMapping(method=RequestMethod.GET)
  public List<Contact> getAll() {
    return repo.findAll();
  }

  @RequestMapping(method=RequestMethod.POST)
  public Contact create(@RequestBody Contact contact) {
    return repo.save(contact);
  }

  @RequestMapping(method=RequestMethod.DELETE, value="{id}")
  public void delete(@PathVariable String id) {
    repo.delete(id);
  }

  @RequestMapping(method=RequestMethod.PUT, value="{id}")
  public Contact update(@PathVariable String id, @RequestBody Contact contact) {
    Contact update = repo.findOne(id);
    update.setAddress(contact.getAddress());
    update.setEmail(contact.getEmail());
    update.setFacebookProfile(contact.getFacebookProfile());
    update.setFirstName(contact.getFirstName());
    update.setGooglePlusProfile(contact.getGooglePlusProfile());
    update.setLastName(contact.getLastName());
    update.setLinkedInProfile(contact.getLinkedInProfile());
    update.setPhoneNumber(contact.getPhoneNumber());
    update.setTwitterHandle(contact.getTwitterHandle());
    return repo.save(update);
  }

}
You should now be able to see why the MongoRepository interface we created earlier makes our lives easier  The only part of this code that you might have questions about is the @Autowired annotation. This annotation tells Spring’s dependency injection framework to inject an instance of ContactRepository into this REST controller when the REST controller is created. (Spring Boot will automatically create an instance of our ContactRepository for us…part of the auto configuration magic of Spring Boot!)
Before we can test out the application you will need a Mongo DB server installed. This is not hard to do if you want to have one locally installed on your machine. You can follow the instrcutions on the Mongo DB download page for the OS you are using. The other option is to use a cloud hosted Mongo DB service like Mongo Labs. Mongo Labs has a free plan that is perfect for development purposes.
By default Spring will assume that your Mongo DB server is running at localhost:27017 and does not require you to authenticate. If that is not the case than you need to tell Spring how to connect to your Mongo DB server. To change the Mongo DB URL Spring uses we can use a properties file. If you created your Spring Boot project using start.spring.io, there should be a file called application.properties in src/main/resources. If the file is not there go ahead and created it. Inside the file add the following line
spring.data.mongodb.uri=mongodb://username:password@host:port
replacing username and password with the username and password to your Mongo DB server. If you don’t need a username or password just remove that part. Then replace the host and port with the host and port of your Mongo DB server.
Now that your Mongo DB server is up and running, you can start your Spring Boot app. To do this you can either open the Application.java file and run it as a Java Application from within Eclipse or if you want to use Maven from the command line run mvn spring-boot:run from the directory containing your POM file. Tomcat should start up on localhost:8080.
There are several options for testing your API, I suggest you either use CURL if you are fond of the command line, or a REST client if you are not. There are several good REST clients out there. I like the Firefox REST Client plugin. If you are a Mac user, Paw is a newer client that I have been using lately, it seems really promising.
The first thing we can try out is to make a GET request to get all contacts from the DB. It should return an empty array since we haven’t added any contacts yet. From your REST client make a GET request to http://localhost:8080/contacts. You should get an emtry JSON array back.
Not lets add a new contact. To do this we will need to construct a JSON object for a contact. Here is some sample JSON you can use.
{
    "firstName": "Ryan",
    "lastName": "Baxter",
    "address": "1600 Pennsylvania Avenue NW Washington, DC 20500",
    "phoneNumber": "202-456-1111",
    "email": "ryan@example.com",
    "twitterHandle": "@ryanjbaxter",
    "facebookProfile": "https://www.facebook.com/ryan.baxter.7545",
    "linkedInProfile": "http://www.linkedin.com/in/ryanjbaxter/ ",
    "googlePlusProfile": "https://plus.google.com/+RyanBaxterJ"
}
To create a contact we need to issue a POST request. Copy the above JSON into the request body field of your REST client and make a POST to http://localhost:8080/contacts. You may also have to set the Content-Type header of the request to application/json if your REST client does not automatically do that for you. You should get a 200 back after making the request and if you look in the response body you should see pretty much the same JSON we posted to the server except that this JSON object has an ID field. The ID was added when the object was stored in the Mongo DB, that ID is the unique ID for this object.
If you once again make a GET request to http://localhost:8080/contacts you should now get back a JSON array containing the contact we just created.
Now lets modify the contact object we created above by changing the phone number. We once again will need some JSON containing the modified fields, so here is a sample
{
    "firstName": "Ryan",
    "lastName": "Baxter",
    "address": "1600 Pennsylvania Avenue NW Washington, DC 20500",
    "phoneNumber": "202-456-2222",
    "email": "ryan@example.com",
    "twitterHandle": "@ryanjbaxter",
    "facebookProfile": "https://www.facebook.com/ryan.baxter.7545",
    "linkedInProfile": "http://www.linkedin.com/in/ryanjbaxter/ ",
    "googlePlusProfile": "https://plus.google.com/+RyanBaxterJ"
}
Notice the difference in the phone number. In your REST Client add the above JSON to the request body and make a PUT request to http://localhost:8080/contacts/{id}. Replace {id} with the ID you got back when you made the POST request above. If the request succeeds than you will get back a JSON object with the updated phone number in it.
Finally lets test the DELETE method by making a DELETE request to http://localhost:8080/contacts/{id}. Replace {id} with the ID to the contact object. You should get a response back with an HTTP status code of 204, meaning that the request completed successfully but did not return back any content.
That is all there is to creating a REST API with Spring Boot with Mongo DB!
There is much more to do and explore on this topic. The MongoRepository interface is extremely powerful and allows you to create custom queries, so I suggest you read more in the documentation. Believe it or not, we can actually build the same REST APIs with less code. Spring has a project called Spring Data REST which would allow us to completely eliminate the ContactRestController class we wrote. You can see an example of using this project here.
