Update: Some of the content here is out of date, please see my updated blog post.
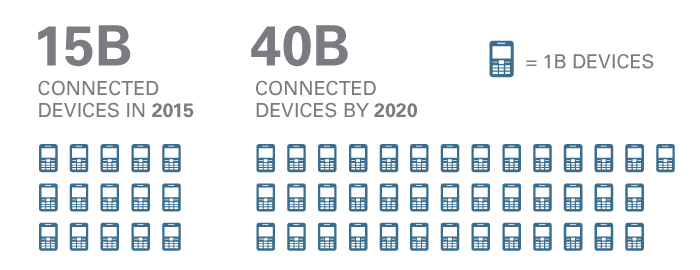
Want to take a guess as to how many devices will be connected to the internet by the end of 2015? Give up? 15 billion. Yup ,that’s right, that is 15 followed by 9 zeros. By 2020 that number will increase to 40 billion!
All of these devices make up what is called the internet of things. As you might imagine with the number of devices growing there have been a number of new technologies emerging that help developers connect and use the data comming from these devices. One of the more important ones is MQTT. “MQTT is a machine-to-machine (M2M)/”Internet of Things” connectivity protocol. It was designed as an extremely lightweight publish/subscribe messaging transport.” In response to the growing number of devices and the clear importance of gathering information from these devices IBM has developed an Internet of Things (IoT) Cloud which at the core has an MQTT instance that developers can use. This offering is currently in beta but is quite functional and can be used to publish and retrieve data from your connected devices. Of course once you have a device connected to the IBM IoT Cloud you want to build an app around the data coming from that device. This is where Bluemix comes in. Using a combination of the IBM IoT Cloud and IBM Bluemix you can have a complete cloud based solution for your IoT apps. Bluemix already has a service that is part of its catalog to connect to the IBM IoT Cloud. In addition to the service, Bluemix has a boilerplate for the internet of things which stands up a Node-RED instance allowing you to design flows for your IoT data.
As part of IBM’s IoT Cloud there are a number of “recipes“. Recipes are basically example IoT scenarios that can get you up and running quickly. The recipes contain instructions on how to setup the device as well as provide you with the code needed to connect the device to the IoT Cloud and publish data. What makes using these recipes even easier is the Quickstart service that is part of the IoT Cloud. When using the IoT Quickstart you don’t have to sign up for anything or register any devices, you just run the code given to you in the recipe, head to the qucikstart page, enter the MAC address of the device, and you can see the data being published to the IoT Cloud. There are some limitations to using the Quickstart, but to get a device up and running quickly it couldn’t be easier. Being new to the whole IoT concept I decided to pick one of the recipes to experiment with. I ended up choosing the Beaglebone Black and TI Sensor Tag recipe. The main reason I chose this one was because the Sensor Tag had a number of sensors on it that you could use for different and interesting use cases. Plus the Beaglebone Black, Sensor Tag, and Bluetooth LE USB adapter costs less than $100. After my Beaglebone Black and Sensor Tag came in I was able to quickly follow the instructions in the recipe to start publishing data to the IoT Cloud.
Of course like any good developer I started to look at the code provided in the recipe. I noticed that what it was doing was gathering data from all the sensors on the Sensor Tag and then publishing it under a single topic to the IoT Cloud. I thought it would be better to publish multiple topics so consumers can subscribe to just the data they need. I also wanted to use the left and right buttons on the Sensor Tag and I thought you would see a lag between the time a button was pressed and the time the data was published to the IoT Cloud if you had to wait to gather data for all the sensors first. I quickly realized that if you wanted to publish more than one topic to the IoT Cloud you could not use the Quickstart. You actually had to sign up for an account and register the device. This ended up being really easy as well, given there was a recipe describing how to connect a registered device to the IoT Cloud. After some time coding I was left with 1 project with three components to it.
- The first component publishes data from the Sensor Tag to the IBM IoT Cloud and is written in Node.js. It publishes multiple topics for the different types of data coming from the Sensor Tag and requires you to register the device publishing the data.
- The second component consumes the data from the Sensor Tag that was published to the IoT Cloud. It contains 2 web apps, one which visualizes the values of the sensors and another which allows you to control an HTML5 slide deck with a Sensor Tag. The server portion of the webapp is written in Node.js. The Node.js code connects to the IoT Cloud and subscribes to the topics from the first component (the publish component). When the Node code receives data from the IoT Cloud it published that data via web sockets to a web application. Since this component is just a Node.js webapp it can easily be deployed to Bluemix.
- The third component also consumes the data from the Sensor Tag but it consumes it via a Node-RED flow. Again you can run this Node-RED flow in Bluemix.
The code for this project can be found on GitHub. The READMEs contain many more technical details. Below are two videos demoing the code. The first one is a short video demoing one single use case. The second video goes more in depth and demos using the Beaglebone Black.


